|
Toll Free 1-888-726-9752 |
Order 1-
888-726-9752
|
|
| ||||||
|
PLEASE, READ CAREFULLY THIS MANUAL AND FOLLOW IT FOR YOUR SAFETY.
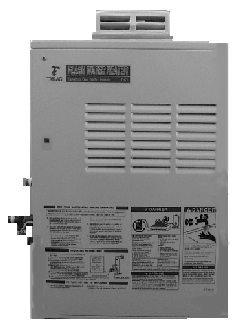
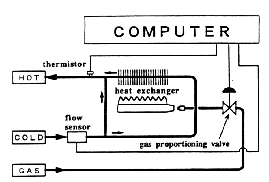
OPERATION [BACK TO CONTENTS] GENERAL The Flash Water Heater is an instantaneous, tankless
water heater designed to supply all your household and commercial hot water needs
utilizing total efficiency. The principle behind the Flash Water Heater is simple. Once
you open a hot water tap, water flows through the Flash Water heater. The water flow
sensor automatically commands the computer to electronically ignite the burners and the
computer monitors the water temperature, volume of water, and gas flow the insure you get
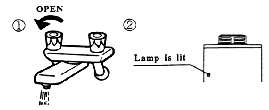
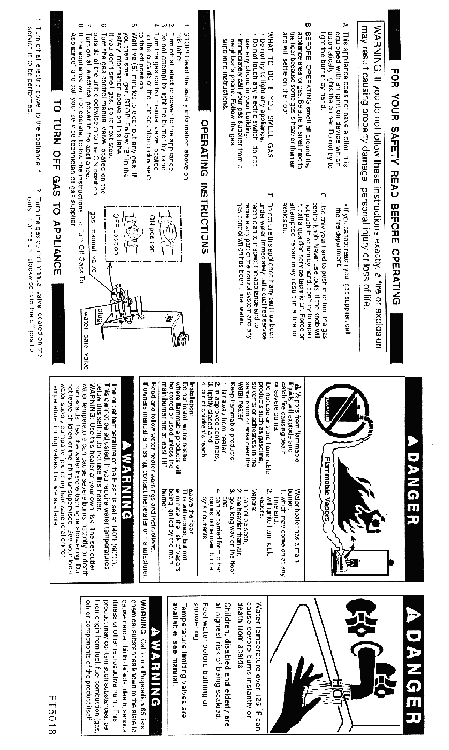
the right amount of hot water in a Flash. After the burners are ignited the "fire on" lamp is lit. 0.75 gallons per minute is required to turn the burners on, After the burners are ignited, the flow rate can be lowered to 0.6 gallons per minute to maintain and still keep the heater on. Now as long as you have water, gas and electricity, you will get an endless flow of hot water. Open a hot water tap to turn on your water heater. Close the tap to turn off your water heater. Normal Operation [BACK TO CONTENTS] To Turn on Your Flash water heater
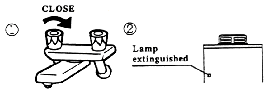
To Turn off your Flash water heater
Once you have properly installed the unit, check the gas and water connections for leaks. Check for proper ventilation and combustible air to the heater. Purge the gas and water lines to remove debris. Then follow these steps to turn on your unit.
Temperature The temperature has been set at the factory at 140ş F (60ş C). This is electronically controlled by the computer and cannot be adjusted. Mix the hot water with cold to get the water temperature you desire. WARNING : Temperatures above 125ş F (52ş C) can cause severe burns or death from scalding. Children, disabled and the elderly are at high risk of being injured. Feel the water temperature before bathing or showering. Do not leave children, disabled, and the elderly unsupervised. The inlet water temperature will dictate how much hot water you can produce, but you will not be able to produce more than 4.8 gallons per minute of hot water because there is a flow governor restricting the water flow. Freeze Prevention Devices [BACK TO CONTENTS] This unit comes equipped with heaters that discourage the unit from freezing. For this freeze prevention system to operate there has to be electrical power to the unit. The freeze prevention devices will not work if the electrical power source is disconnected. The unit has been rated for temperatures down to 5ş F (-15ş C) in a wind free environment. The wind chill factor will cause the unit to freeze at temperatures above 5ş F (-15ş C). Do not install the water heater in an area with extremely cold weather. This will void your warranty and Takagi - USA will not be responsible for any damage that occurs. CAUTION : The pipe heaters are located on the Flash Water Heater only. Any hot or cold water pipes located outside of the unit will not be protected. Properly protect and insulate these pipes from freezing. Winterizing If you will not be using your heater for a long period of time or if the temperatures will drop below 5ş F (-15ş C) with the wind chill factor, turn off your heater and drain the unit of water. This will keep your unit from freezing and being damaged. Follow these instructions carefully:
Now when you want to use your heater again follow these steps :
INSTALLATION [BACK TO CONTENTS] General All gas water heaters require careful and correct installation to insure safe and efficient operation. This manual must be followed exactly.
Accessories
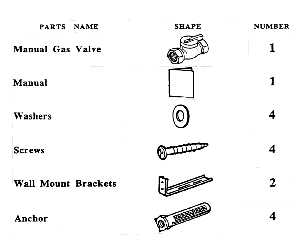
Check that all parts listed below were included with the unit.
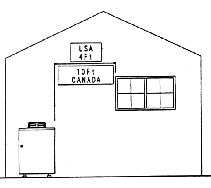
OUTDOOR INSTALLATION [BACK TO CONTENTS] Follow all local codes and in the absence of local codes, follow the National Fuel Gas Code ANSI Z221.23 in USA or in Canada CAN/CGA B149.1 or .2 Installation of Gas Burning Appliances. Locate the water heater in an open, unroofed area, and maintain the following minimum clearances from combustible and noncombustible materials.
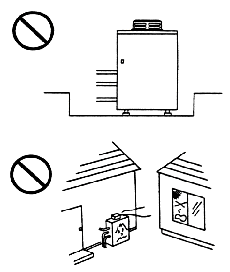
Do not install this water heater under an overhang,
less than 3 feet from its top. The area under an overhang must be open to three sides.
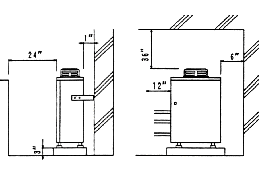
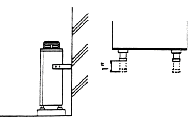
When installing the Flash Water Heater on the
placement stand, be sure to adjust the legs so that it stands straight and securely.
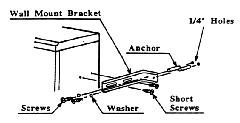
(Adjustable legs can be moved up to 1" ) Use the wall mount brackets to securely attach the T
- K1 to the wall. Use a screw to attach the longer part of the wall mount bracket
temporally to the heater and determine screw positions on the wall. Then drill a Ľ"
hole in the wall. Insert anchor. Tighten all 4 screw. Minimum clearance behind the heater
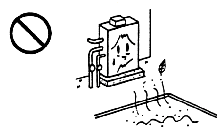
is 1" WARNING : Do not have the flue terminal pointing toward any opening into a building. Do not locate your heater in a pit or location where gas and water can accumulate. WARNING : Do not install the heater where water, debris, or flammable vapors may get into the flue terminal. This may cause damage to the heater.
WARNING : In the USA, do not install the heater with the vent within 4 feet of any opening into a building. In Canada do not install the heater with the top of the vent assembly within 10 feet any opening into a building.
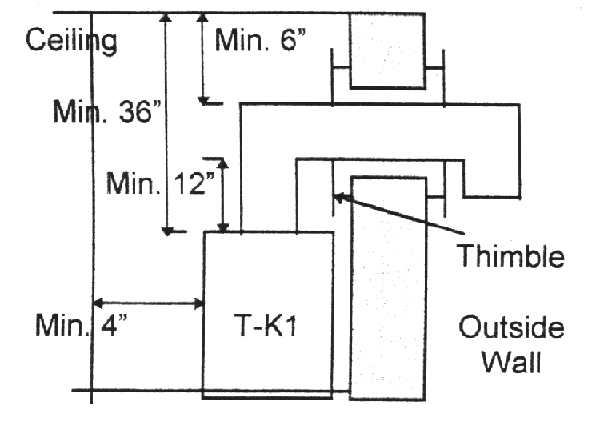
WARNING : Improper installation can cause nausea or asphyxiation from carbon monoxide and flue gases which could result in severe injury or death. For high altitude installation above 4,500 feet. Contact the manufacturer on how to handle this situation. This unit is not certified to be installed at an altitude above 4,500 feet INDOOR INSTALLATION [BACK TO CONTENTS] FOR INDOOR INSTALLATION REMOVE OUTDOOR VENT CAP AND INSTALL 4" VENTING DIRECTLY ON FLUE OUTLET. Please Check inside unit when install to indoor. The water heater location must provide enough air proper combustion and ventilation of the surrounding area. See the latest edition of ANSI Standard Z223.1 and any your local codes that should be applicable. DO NOT INSTALL DIRECTLY ON CARPETING. In general these requirements specify that if the unit is installed in a confined space, there must be at least two permanent air supply opening. One opening should be within 6 inches of the ceiling, and the other should be within 6 inches of the floor. Minimum recommended Air supply to water heater
The area indicated is for one of two openings one at floor level and one at ceiling, so the total net free area would be double the figures indicated. Where, outside air supply, when combustion air is supplied directly through an outside wall, each opening should gave a minimum free area of one square in per 4000 BTUH input of the total input rating of all appliances in the enclosed area. Inside air supply, when combustion air is supplied from inside the building, each opening should have a minimum free area of one square inch per 1000 BTUH input of the total input rating of all appliance in the enclosed area. These openings should never be less than 100 Sq. IN. (T-K1 should be open Min. 165 Sq.In (13" x 13" Square Open each bottom and top ), Please check the local plumbing code. This water heater must be vented in accordance with Venting of Equipment, of the latest edition of the National Fuel Gas Code. WARNING : Improper venting of this appliance can result in excessive levels of Carbon Monoxide which can result in severe personal injury or death.
The vent system must be gas tight. All seams and joint must be sealed with silicone sealant or adhesive tape having a minimum temperature rating of 400ş F. For best results, a horizontal vent system should be as short and straight as possible with Single wall Galvanized steel vent pipe or stainless steel vent pipe. The entire vent system must not exceed the size specified in table.
Horizontal Venting
For each elbow added, deduct 5 ft. from max. vent length. When the horizontal vent run exceeds 5 ft the following criteria must be observed ;
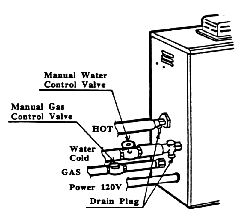
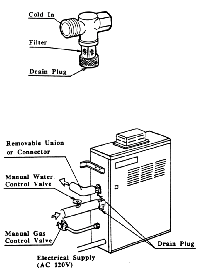
A side wall vent terminal must be used when the water heater is vented through a side wall. Use Takagi - USA part No. T-V1 The hood provides a means of installing vent pipe through the building wall and must be located in accordance with ANSI Z223.1 and local applicable codes. GAS SUPPLY AND PIPING [BACK TO CONTENTS] This unit comes furnished with an approved manual gas control valve that must be placed on the unit before it is connected to the gas line. Check the gas inlet pressure and the type of gas matches the rating plate located on your water heater. Insufficient gas pressure will cause your Flash Water Heater to be inefficient and not work properly. Size the gas piping correctly. The minimum and maximum inlet gas pressures are listed below:
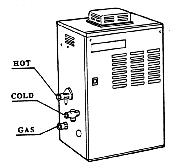
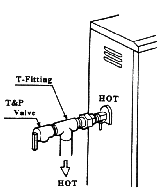
Maximum gas pressures must not exceed this value. Minimum gas pressures are for purposes of input adjustment. After the connections are complete check for gas leaks by applying soapy water to all gas fittings and connections. Soap bubbles are a sign of gas leaks. This appliance and its individual shut-off valve must be isolated from the gas supply piping system by unplugging the unit and turning off the main gas valve during any pressure testing of the gas supply piping system at test pressures equal to or less than ˝ Psi. The appliance and its gas connections must be leak tested before placing the unit in operation. Always use approved connectors to connect the unit to the gas line. Always purge the gas line of any debris before connection to the heater. WARNING : Conversion of this unit from natural gas to propane or propane to natural gas cannot be done in the field. Contact your local retailer or distributor to get the correct unit for your gas type. Water Connections [BACK TO CONTENTS] An approved manual water control valve must be placed on the cold water supply line. All soldering materials and piping materials must be useable with potable water. If the water heater is installed in a closed water system, such as one having a backflow preventer in the cold water supply line, means shall be provided to control thermal expansion. Contact the water supplier or local plumbing inspector on how to control this situation. Purge the water line to remove all the debris and air from it. It may damage the heater if you do not. There is a wire mesh filter to discourage debris from entering your heater. This will need to be cleaned periodically. WARNING : Do not reverse the hot outlet and cold supply line connections to the Flash Water Heater. This will cause your heater to operate dangerously. Make sure the hot and cold lines are connected properly. Refer to the FOR YOUR SAFETY section at the front of this manual. TEMPERATURE AND PRESSURE RELIEF VALVE [BACK TO CONTENTS] This unit does not come with an approved temperature and pressure relief valve. An approved temperature and pressure relief valve must be installed on the hot water outlet. A "Tee" fitting should be used to attach the temperature and pressure relief valve. The temperature and pressure relief valve must meet not exceed the following:
The discharge capacity must be at least 165,000 Btu/hr and the discharge opening shall be piped to a suitable drain to prevent water damage should discharge occur. If the temperature and pressure relief valve on the appliance discharges periodically, this may be due to the thermal expansion in a closed water supply system. Contact the water supplier or local plumbing inspector on how to correct this situation. Do not plug the temperature and pressure relief valve. The relief line should have no reduced fittings or other restrictions and should allow for complete drainage of valve and line. The temperature and pressure relief valve must be manually operated once a year to check for correct operation. Should overheating occur or gas supply fail to shut off, turn off the manual gas control valve to the appliance.
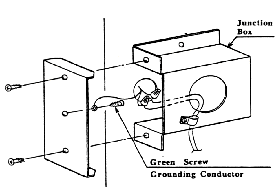
Electrical Connections [BACK TO CONTENTS] WARNING : The heater must be electrically grounded in accordance with the most recent edition of the National Electrical Code, ANSI/NFPA 70. In Canada, all electrical wiring to the heater should be in accordance with local codes and the Canadian Electrical Code, CSA C22.1 Part 1. Do not rely on the gas or water piping to ground the metal parts of the heater. CAUTION : Label all wires prior to disconnection when servicing controls. Wiring error can cause improper and dangerous operation. Verify proper operation after servicing. The T-K1 requires an electrical power supply from 120 VAC 60 Hz circuit and be properly grounded.
Refer to the wiring diagram. Wiring diagrams are also located on the
inside panel of the appliance. Wiring Diagram [BACK TO CONTENTS] Also wiring diagram are located on the inside panel
of the appliance. Electrical Rating 120 VAC, 60 Hz Note : If any of the original wiring supplied with
this appliance must be replaced, it must be replaced with appliance wiring material (180c)
or its equivalent. Wires are available through the manufacturer. For your safety read before operating. WARNING : If you do not follow these instructions exactly, a fire or explosion may result causing property damage, personal injury or loss of life.
WHAT TO DO IF YOU SMELL THE GAS!
Operating Instructions
TO TURN OFF GAS APPLIANCE Close the manual gate valve on the gas inlet line. Then turn off the power supply. Manifold pressure taps. Maintenance and Service [BACK TO CONTENTS] WARNING : Always turn off the electrical power supply, turn off the manual gas control valve, and turn off the manual water control valve whenever servicing. The unit should be check once a year by a certified and trained technician. If repairs are needed, the repairs should be done by a certified and trained technician. Systems and parts that should be checked at least once a years.
TROUBLE SHOOTING AND COMMON QUESTIONS. [BACK TO CONTENTS] Q: No hot water Q: The "on" lamp is not lit. A: After you turn on the power supply, you must wait 30 second to start the unit. A: Open the manual gas shut off valve all the way. Q: While using the appliance the flame went out. A: Open the manual water shut off valve all the way. A: Clean the filter if necessary. Refer to the maintenance and service section. A: A minimum water flow of 0.8 GPM is needed to activate your heater. Q: When I open the hot water tap and mix it with cold water the water turns cold. A: A minimum water flow of 0.8 GPM is required to activate your heater. After the heater is activated, the required water flow drops to 0.6 GPM to keep your heater on. If the water flow rate falls below 0.6 GPM, the burners will turn off automatically. Q: White smoke comes out from the exhaust vent. A: During the winter when temperatures are colder the exhaust fumes condensed in the air to produce the white steam. Q: When I open a hot water faucet, I do not immediately get hot water. A: It takes time for the hot water to get from the heater to your faucet. Q: Even after I turn off the hot water tap, the fan is still spinning. A: The fan is designed to be on for a full 70 seconds after the hot water tap is turned off to eliminate any residual gas and flue products. Q: Keep "on" light is blinking, and no hot water when you turn on hot water tap. A: Check first Hi-Limit switch then Pressure switch
and your vent system which is might be clogged out by something. Call service person.
| ||||||||||||||||||||||||||||||||||||||||||||||||||||||||||||||||||||||||||||||||||||||||||||||||||||||||||||||||||||||||||||||||||||||||||||||||||||||||||||||||||||||||||||||||||||||||||||||||||||||||||||||||||||||||||||
This web site is managed and maintained by Global Pro Tankless Supply. Privacy Policy. 24050 Commerce Park, Cleveland, OH 44122 • Phone 888 726-9752 • Fax 216 360-0425 • info@globaltowne.com |